
21 Awesome Tips For Maintaining A Home Theater
21 Awesome Tips For Maintaining A Home Theater

A home theater can be maintained through various means that includes checking for loose connections, watching for failed components, keeping your equipment clean, making sure components are secure, and even adjusting picture quality should it deviate over time.
Following these, and the rest of the tips in this article should help prolong the life of your home theater!
It’s probably not a stretch to assume that like me, you find home theater to be some level of fun and engaging.
But over time you may have wondered, how can you actually maintain your home theater?
Well here’s something you may not have known; over time, heat, temperature swings, dust buildup, and even electrical issues can have a big impact in the preservation of your home theater.
From connections that might become loose, to a display that might shift its color over time, a number of things can go wrong in your entertainment space that you might not even immediately notice.
Eventually, these start to have a direct impact on not only your system performance, but its overall longevity as well.
So what I wanted to do is talk about a few home theater maintenance tips that’ll hopefully help you avoid issues with your system, and keep your speakers and equipment in great shape for years to come.
These will be easy to implement and direct ways you can maintain the life of your large or small home theater setup, while further optimizing what you currently have so that you’re confident you’re getting the best home cinema experience possible.
Do keep in mind you’ll also want to monitor the following items talked about in this guide at least once a year.
That way the health of your sound system is kept in pristine condition.
This article should be a helpful reference so without further ado, let’s get to it!
1). Ensure All The Screws Inside Are Secured

Whether it’s the vibration from the speakers themselves or just general movement, it’s actually possible for the components within to loosen.
You might hear some sort of noise not normally associated with the speaker which can be indicative of this, and sometimes it might just happen and you don’t necessarily notice it.
Ultimately this may result in a muddy and stifled sound.
So to fix this, and ideally prevent this, there’s 2 things you can do.
The first is the more obvious answer of checking for any loose screws.
But besides just manually checking each speaker, another more efficient way to see if something is awry is through what’s often known in the audio world as frequency sweeps.
Frequency sweeps to put it simply, are specialized tones that run through the frequency range from high to low (or vice versa) to detect any abnormalities with your speakers, ie. (an unwanted resonance, a spike in volume, etc.)
The volume should remain the same at every frequency and if it doesn’t, then it’s indicative of an issue and could be something as simple as a screw loose in a driver somewhere.
Here’s a track you can use to test this yourself.
http://www.theory.physics.ubc.ca/341-current/sweep.html
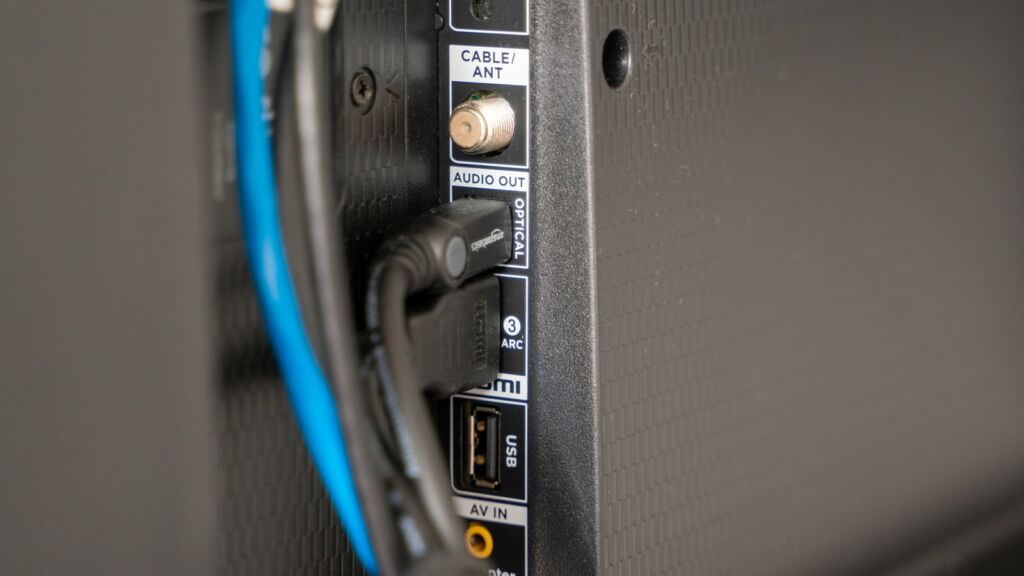
2). Making Sure Connections Are Secured

This one is pretty simple, but occasionally check that the connections in your audio equipment are also secured.
When they aren’t, problems with audio quality and even audio volume can arise which can be problematic since things wouldn’t be performing at their optimal levels.
Also make sure that the connections on the back of your receiver aren’t touching as that can cause issues too from what I’ve noticed.
3). Watch For Any Failed Devices In Your Home Theater

Another thing to watch for are failed components.
Over time, different parts in your home theater from the receiver, to speaker drivers, and even the subwoofer can give out for a number of reasons.
Speakers and subwoofers can be especially susceptible since their voice coil & amp can potentially overheat and malfunction if played beyond their capabilities.
One way to see if a something has failed is by playing pink noise individually speaker by speaker to actually notice whether they’re functioning correctly or experiencing some sort of issue.
This can helpful with regards to ascertaining the level of functioning of the receiver and the subwoofer too.
Remember, playing your volume too loud can definitely speed up component failure so be mindful of that.
Anything higher than reference level volume especially (85 decibels) since that surpasses the agreed upon audio standards, and approaches the upper threshold of the speaker’s capabilities & general listening comfortability.
Luckily electronics equipment, especially when it comes to home theater, often have some kind of warranty included when purchased — so the manufacturer may be replace to replace it within an alloted time period if anything should happen to fail.
Plus there’s various options available with regards to extended warranties for audio equipment.
4). Occasionally Remove Dust From Your Speakers
Another thing that’s almost inevitable is that at some point dust may begin to accumulate on your speakers.
Something you may not have been aware of however is that dust not only affects the look of your speaker, but its performance as well.
Dust can infiltrate the wire connectors and disrupt the electrical signal that runs between the loudspeakers and their source, muddying the sound.
Not only that, dust can also get under the speaker grille itself.
In order to properly clean your speakers, a dry or even slightly damp microfiber clothe can be used to gently remove any dust or marks on the cabinet.
If it’s an older speaker or really bad, a tiny drop of a gentle wood cleaner should suffice.
This is the one I use.
Weiman Furniture Polish & Wood Cleaner Spray
You can wipe the other parts of the speaker too as long as long as you’re careful.
Over time and over the years, old clothe surrounds (the lining around the drivers) may dry out and become brittle, potentially tearing as a result.
What you can do to remedy this if this has happened and they are really old speakers, is taking a very small amount of silicon sealant and rubbing it into the clothe which might help strengthen the material and help it perform like it use to.
That may help the speaker last for years to come.
Just keep in mind to not directly touch the dome tweeters on the speaker since that can actually damage it.
If you do happen to notice dust on the surface though then a photographic lens blower can be used to remove the dust.
5). Cleaning Things Like Switches & Knobs

Analog switches & the knobs on your equipment can experience a number of issues from becoming brittle to even breaking off.
Things like humidity, moisture, temperature, and usage all play a big part in how long these particular components last.
Try to keep equipment in temperate & dry conditions to avoid corrosion.
Furthermore, test tones through your equipment like speakers, subwoofers, etc. can help spotlight potential problems with any of the dials or switches when sat close to it.
It might sound like some sort of ringing if this is the case.
Once that problem has been found, you have multiple choices.
The most obvious choice would be replacing the module with a new one, but if this isn’t possible then you can technically treat the corrosion with a cotton swap & isopropyl alcohol.
There are also many other options you can use including baking soda, white vinegar, and even lemons!
https://treasurepursuits.com/how-to-remove-corrosion/
As for preventing the corrosion of these components, you also have a myriad of ways in achieving this that includes applying a protective coating, using a dehumidifier, and cleaning any accumulated dust present.
https://latem.com/blog/prevent-corrosion-metal-parts.htm
Excess dust can actually accelerate the corrosion process due to fact that dust absorbs water.
This unintentionally invites water to come in contact with these parts, which speeds corrosion along.
So by taking these steps, you can prolong the life of your equipment.
6). Using A Surge Protector Can Be Helpful
Speaking of prolonging the life of your equipment, another often overlooked aspect of home theater/entertainment is caring for the components that power it.
More specifically, implementing proper power management to protect your devices while ensuring you’re getting the best possible performance is really important in my opinion.
Surge protectors are often used to do this while, like their name suggests, protecting your stuff against things like electrical surges that might otherwise overload and potentially damage them.
This surplus of power can also cause your home theater receiver to randomly shut off too.
I also speak from personal experience since a lightning storm a few years back actually fried my equipment when I wasn’t using one.
Safe to say I learned my lesson with that one lol.
Line conditioners are also a helpful aspect of power management since some of them can actually benefit your sound by making the connection cleaner though whether it’s noticeable is of course subjective.
Still they can be helpful and sometimes there’s even devices that combine the 2 that make this an easy thing to implement.
Power conditioners are definitely helpful to consider for your equipment.
AC Power Filter Power Conditioner
7). Placing Receiver & Amps in Well Ventilated Areas

With receivers and amps becoming increasingly complex, their needs for an adequate cooling solution have also increased.
This can have an affect on how long the receiver actually lasts.
Now putting them in as open of an area is preferable, but whether this is always possible is another story.
For example if the space you plan on placing it is on the smaller side then this might not always be applicable.
Luckily there are ways to hide home theater equipment while also keeping said equipment cool.
The important thing to remember when it comes to receivers is that allowing them space and enough airflow can be an integral part of them continuing to actually function correctly.
This includes remembering to never put any objects on top of them as it can block the ventilation of the unit.
Barring defects, they typically last quite a while when properly taken care of.
But what if you don’t have much room, what then?
Well then you could use some type of fan that actually keeps them cool in the space they’re placed in.
There’s many different types so you’ll want to decide on the one that best fits the particular space the unit is in and where it’ll actually fit.
8). Cleaning Blu-ray Players & Receivers

Over time, it’s likely that some amount of dust may begin to collect on some parts of your receiver and other devices like Blu-ray players and the like.
You’ll want to keep them clean so that they continue to function properly but how exactly do you do that?
Well it’s actually pretty simple.
First make sure everything is unplugged, then, using a microfiber cloth, gently wipe the outside of the device to remove any dust that may have accumulated on the outside of the chassis.
Make sure you do so gently without pressing on the device in any way.
If you happen to notice that there’s dust and stuff that won’t come off, then you can use a small bit of water on the clothe itself; just enough to make it slightly damp to help clean it.
Never use any kind of chemicals or anything like that as there could be the possibility that it damages the device which certainly isn’t good.
If you happen to notice that there’s dust inside, I wouldn’t necessarily use a compressed air can for getting dust out that device since it’s possible it could leave some amount of moisture behind briefly which isn’t good for electronics.
What may help is some sort of electronic duster that uses dry air instead which can be helpful to remove the dust. Just be careful since the internals of these devices are delicate and start on the lowest setting first.
9). Making Sure Your Cables Are Situated
Not only does having wires all over the place take away from the aesthetic of your home theater, it can also be a tripping hazard as well.
There’s also the fact that it’s easier to troubleshoot should something go wrong, coupled with it allowing your AV system to continue working properly.
There’s many ways to do this, and it’ll really boil down to personal preference I feel, but you just want to make sure that all of your cables that connect your stuff is situated.
Not doing so can not only take away from the look of your home theater, but also could damage the wires themselves over time if they somehow get tangled.
To help you with more specific ways on hiding speaker wires by the way, be sure to check out the guide I also did on that very thing a while back.
https://easyhometheater.net/hiding-speaker-wire-solutions
10). Bi-Wire Connections Can Experience Issues

Some speakers have the ability to bi-wire (using 2 sets of speaker wire for treble & bass) and have what’s called bi-wire jumpers that allow the user to connect those wires.
It’s often thought that better quality audio can be experienced when using wires in this way but it might be subjective and depend on the person.
Unfortunately though, over time these these parts can sometimes experience issues for a number of reasons.
Beforehand, playing a pink noise track can be a helpful way to ensure that this are actually working the way they should be.
But if you do notice something is off, then they can be lightly cleaned with a soft and dry cloth to see if it helps.
Every year or so, I’d recommend removing and cleaning them to ensure your audio quality remains pristine. Just make sure your equipment is off before doing so.
11). Cleaning Your Projection Screen & Projector Chassis

Like with anything, you may notice dust begin to accumulate on you projector screen and even in the device itself.
What makes it difficult for me to recommend any one solution to this is the fact that each screen is different — meaning each will have different cleaning needs.
So what I would recommend is referring to the manufacturer’s guide to see what cleaning solutions can be used with your particular screen since using the wrong one could damage it.
As for the projectors chassis, pretty much the same thing — you can use a dry micro fiber cloth to clean any excess dirt it may have though every so often.
12). Cleaning Dust & Fingerprints On The TV

The way you clean your television is definitely important as doing this wrong can result in you damaging the screen.
I’ve found using a microfiber clothe to helpful as it tends to remove excess dust pretty effectively in my opinion.
When cleaning it, make sure that you don’t apply any kind of pressure or anything to the screen since that could damage the panel.
If the screen is dirty and the microfiber clothe doesn’t help, then an easier way to clean the television though I’ve found is using electronic wipes.
These are specialized wipes specifically designed to clean delicate electronics.
It’s definitely personal preference, but I’ve found them to be a more efficient way to clean the screen without worrying about streaks.
13). Preventing & Remedying OLED Burn In

Renowned for their superior picture quality, OLED screens are definitely something to behold.
However there’s one drawback to these displays, and that’s screen burn in.
Screen burn happens when a stationary image on screen remains there for a prolonged period of time which causes that portion of the screen to permanently retain that element.
This can stem from a static logo from a specific channel, to a news ticker on a TV station.
While these sets have certainly gotten much better in recent years, burn in is still a thing that can technically happen.
So what can you do to avoid this, and how can you fix this if it does happen?
Well there’s a few things to remember.
Screen retention is a prior form of burn in that may show as a stuck pixel, or even line of stuck pixels, and is something that can potentially be fixed by turning down the brightness on your display or using anti burn in software on your device.
It can may even be remedied by simply playing the TV.
However burn is something that typically can’t be fixed.
So once you have it, it’s permanent.
You’ll want to avoid getting to this point though, and thankfully there are ways you can prevent this from even happening.
The most obvious would be not leaving stationary images on your television for long periods of time.
The amount of time your TV is on daily may have an impact with regards to this.
You can also lower the brightness to half, or even turn the TV off when it’s not in use.
Remember, the brighter your display, the more rapidly the pixels will decay affecting when the TV might need to be replaced.
Lowering the brightness helps slow that process.
Changing the channel periodically may help too.
Some displays even have a pixel shifting feature so that the image moves on a pixel level that’s unnoticeable to the average viewer.
This helps avoid any kind of image retention and protects the pixels from overuse.
If it’s a newer panel then there’s a good chance it has some sort of preventative measure specifically for burn in.
Check to see if yours does or if it’s still under warranty since that would allow the manufacturer to replace the panel.
14). Adjusting For Display Color Shift

With the aging of your equipment, you may notice the colors that you experience seem different than what it use to be like.
Extended viewing sessions of the unit can affect this even more.
This color inaccuracy can result in the picture quality becoming washed out & dull, or even the opposite happening; the image looking over saturated and bright.
To remedy this, try adjusting picture related settings as it’s dependent on the particular device since these settings might help shift the tone back to normal (unless the device or panel itself is failing)
Keep in mind that using the right color temperature setting may affect your perception of the image too.
Here’s more insight regarding optimizing the image quality.
https://easyhometheater.net/how-to-optimize-your-tv
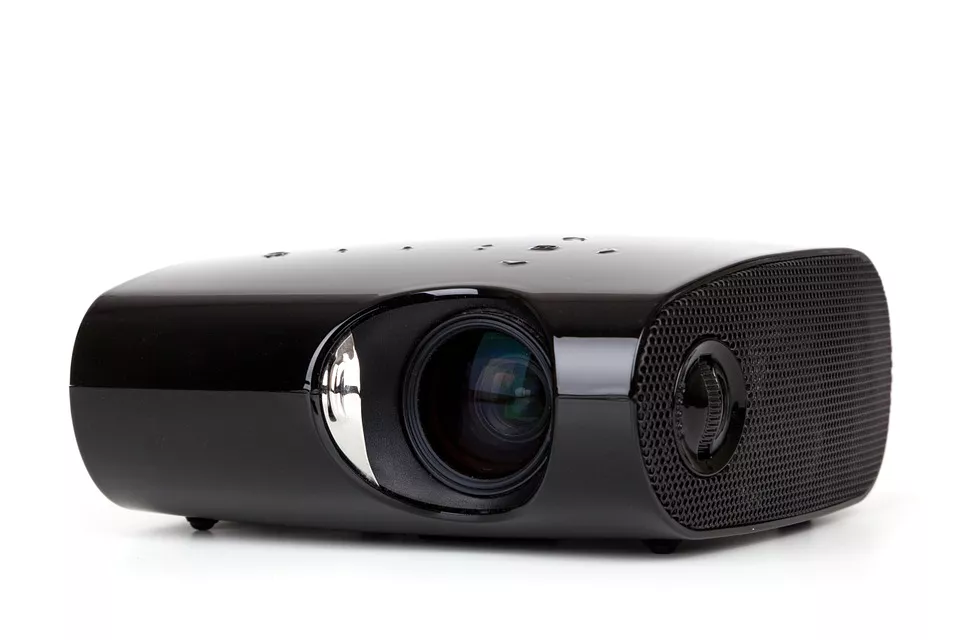
15). Adjusting Projector Focus

Another thing that can happen over time is the focus of the projector itself can shift, causing the image to either look blurry or become titled off axis.
It may even be a subtle change that you don’t notice initially that eventually becomes more apparent.
Thankfully it’s pretty easy to fix this as it simply requires adjusting the sharpness or repositioning so that the image is represented correctly.
The text on the screen should appear sharp and if not, this could be the case.
Depending on the particular projector, it may even have specific settings to fix this very thing so check to see if yours does.
16). Fixing The Alignment Of The Projector Unit
I touched on this previously, but the projector’s alignment can possibly shift and change with extended use through the years.
A good way to test this is by looking at the image on screen an making sure it isn’t tilted one way or another when looking directly at it.
If the image appears even slightly out of the frame, then it’s likely it needs to be adjusted either physically or in the settings.
17). Fixing The Panel Alignment Inside The Projector
With use, sometimes the panels inside the projectors themselves can change or even move which can also potentially affect how the image on screen looks.
Make sure you inspect them regularly and adjust them if needed.
18). Correcting Projector Lens Shift
It’s possible that through normal usage in your home theater, the lens in the projector itself can loosen — which can then throw the presentation of the entire image out of whack.
Occasionally check to make sure the lens is fitted securely and properly aligned in its housing.
The screws should be tight and everything should feel inert.
19). Cleaning The Projector Lens
While checking for lens tightness, another thing you should make sure of is that the projector lens is actually clear of any dust or debris on or near it.
Having any kind of dust on the lens can be projected on to the screen which would impact resulting image quality.
In order to actually clean the lens of the projector, this can be done with a very gentle micro fiber clothe, however when there’s significant dust present, a lens brush can be helpful in my opinion to restore clarity.
The brush should be used in light strokes since the lens is especially sensitive and can easily be scratched if you’re not careful.
I would first check in the product guide or seeing what is recommended by the manufacturer of the projector with regards to whether water or any other specific fluids can be used for your specific projector — since the lens is sensitive and the wrong one can potentially damage it.
I definitely recommend first checking what fluids can be used according to the manufacturer since each projector is different and thus will each have individual needs (this is very important to remember)
20). Fixing The Mount Of The Projector Unit
With longterm use, it’s possible the mount of the projector itself can become loose which is really important since that’s what helps keep the projector secured when mounted.
You’ll want to periodically make sure the screws themselves remain tight since you want it to remain as secure as possible.
Fixing this is pretty easy since it’ll simply involve tightening a few screws.
Using a washer under each screw might help too since it’ll ensure the mount remains sturdy and holds the projector in place.
21). Cleaning & Replacing The Projector Filter
Finally, one of the most important ways that to maintain the health of your projector is by cleaning and replacing its filter.
An obstructed filter impedes the proper air flow and ventilation that the projector needs to properly function which can affect it’s longevity and how well it actually performs.
So my recommendation to you is at about the 180ish watch time hour mark, look at the filter for any accumulated dust or debris and clean it — & if it’s really bad, I’d replace it.
From that point, occasionally check the filter to make sure that it remains clear over time.
Final Thoughts
Hopefully this comprehensive list of home theater maintenance tips & tricks is something you’ll find useful.
With these tips, you can get help to prolong the wellbeing of your equipment and avoid mistakes that could potentially hamper them.
Speaking of mistakes, be sure to check out this guide I did on 25 of the worst home theater mistakes that people often make (some even experienced people make!)
https://easyhometheater.net/25-of-the-worst-home-theater-mistakes
Until next time friends, make it easy, keep it simple.
Related Posts:
")
")


")
")
About Me

Jay
Hey everyone it’s nice to meet you. I'm Jay, writer & founder of the site Easy Home Theater. I've been with this hobby of home entertainment for many years now. I decided to create this site to be a helpful resource, and share everything that I've learned from personal experience with you. I also happen to be a huge gamer, lover of all things tech related, and a major fitness buff (love weightlifting)
Contact: Contact Jay
Facebook: https://www.facebook.com/Easyhometheater/
X: https://x.com/easyhometheater
Pinterest: https://www.pinterest.com/easyhometheater/pins/
Instagram: https://www.instagram.com/easyhometheater/
Followit: https://follow.it/easy-home-theater
Bluesky: https://bsky.app/profile/easyhometheater.bsky.social
Leave a Reply