Hey everyone it’s nice to meet you. I'm Jay, writer & founder of the site Easy Home Theater. I've been with this hobby of home entertainment for many years now. I decided to create this site to be a helpful resource, and share everything that I've learned from personal experience with you. I also happen to be a huge gamer, lover of all things tech related, and a major fitness buff (love weightlifting)
Does The Color Of The Wall Matter For A Projector?
Yes the color of the wall matters for a projector as this will directly influence the image quality you experience. You can use any color, however grey is typically thought of as best due to its balance between reflectivity and light absorption. This is all dependent on your particular viewing conditions since some colors are best suited to specific environments.
Does the color of the wall matter for a projector?
It’s a good question really.
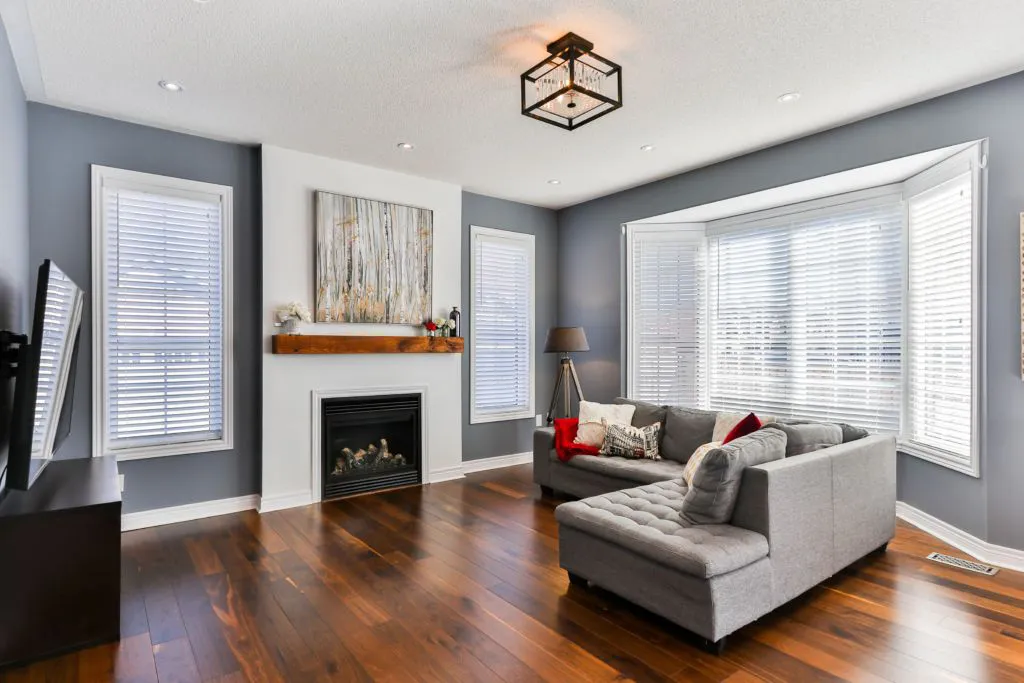
Quality home theater projectors can be a great alternative to the standard television in the living room — with the innate benefits of similar picture quality while being much more portable.
You might even be aware that projector screens are typically used in conjunction with these devices.
However if you decided to instead simply project directly on to your wall, does the color of that wall impact the picture quality?
We’ll answer that specific question while informing you of what to keep in mind in this helpful guide!
The Texture Of The Wall Matters
So before we get into how color can interact with the image quality, the preceding thing to keep in mind before you do anything is considering the type of wall you plan to use your projector with.
Remember, a projector screen is generally more favorable for image quality due to the fact that they typically have a special coating (that walls don’t have) that helps to improve the amount of light they reflect.
This will end making the image appear brighter.
While you can you can take the simpler approach of projecting on to your wall, it’s usually the less recommended option.
But here’s the thing, the texture of the wall that you use will have a direct impact on the quality of the image you see.
If you run your hand across the wall, it’s possible you might still feel somewhat of a texture even if the wall looks smooth from a distance.
If the wall has a small amount of texture, that’s actually fine since it can help to slightly diffuse the incoming light providing for a more balanced picture.
With smooth surfaces, I’ve noticed when there’s a lot of sunlight it can sometimes reflect off it.
However on the flip side if the wall is too textured, that’s where problems can arise.
When there’s really uneven walls, this can cause shadows to form in various areas – causing the image itself to look lose clarity and luminance.
So long story short, make sure the wall you use isn’t all over the place in texture.
What Color Should Your Wall Be For A Projector?
So when it then comes to choosing the best color background for the projector, what color should the wall actually be?
This is actually going to depend on a number of things, but generally speaking, I think opting for some sort of lighter grey when projecting onto a wall tends to work really well in my opinion.
Grey provides the best balance between absorbing just enough light to which could help with viewing angles of your TV, while reflecting enough light to still offer a satisfactory image quality.
A lighter grey is preferable as it’ll provide just enough light reflectivity for acceptable white levels while still offering some of the benefits that a darker tone would.
A general tip is to use the color grey if your projector outputs more than 3400 lumens in terms of brightness, since I’ve found this to generally be around the luminance area where the cone of viewing starts to diminish.
Do projectors Work Better On Grey, White, Or Black Walls?
But will your projected image look better on grey, white, or black walls?
I would still generally say grey; except with the caveat that it depends on your viewing conditions.
White Projector Screen Walls
For example let’s start with the color white.
When using a white wall for a projector screen, these surfaces can be considered neutral gain meaning they reflect light all around them.
While this allows them to produce the highest white levels in content, giving a very bright image, this isn’t ideal for home theater rooms where the environment may be dark.
This reflected light could interact with the image and diminish how it looks both in terms of colors and visibility.
But even during the day if there’s lots of sun light or ambient light coming from windows and skylights for instance, the color white will have more trouble accurately reproducing the deepest black levels.
This could leave the on wall screen image looking less dynamic overall.
White also has the least forgiving viewing angles compared to the others due to its reflectivity.
That means if you have seating that’s positioned off to the sides and off axis, you’ll might get a worse image quality in those positions.
Black Projector Screen Walls
With black projector walls, since the color is technically the absence of light, it absorbs more of it which tends to give the colors on screen more pop and higher viewing angles comparatively.
This makes it great to use if image fidelity is the utmost concern.
However, the drawback with using the color black is that depending on the capabilities of the projector, the projected image on a black surface may not be as bright comparatively, needing more luminance overall.
Also while great for a media room during movie night for example where it’s dark, in a brightly lit living room setting it can make the space seem more compact from what I’ve noticed.
Grey Projector Screen Walls
A grey surface tends to balance the advantages and disadvantages of both with retaining more image fidelity than white walls and higher brightness than black walls.
Though a caveat is that tones of white may appear slightly grey in lower power projectors.
Will A Projector Work On A Colored Wall?
What if your wall isn’t grey, black, or white?
What if it’s a wall of a different color; will a projector work on a different colored wall?
Luckily yes it will.
In fact, some projector makers include some sort of mode or modes that’ll account for reflectivity or tone of the wall, and adjust color levels to give a more accurate image.
Even if your projector doesn’t have this feature, just consider the shade of the wall.
Is it a darker or lighter shade?
That’ll give you an idea of what conditions your projector will work best in and the kind of picture quality you’ll experience with that particular wall.
Do You Need Special Paint On Wall For A Projector?
Now what about the paint itself, does it need to be of a particular kind?
Ideally, for the best picture quality, yes.
There actually exists a type of paint specifically for use with projectors.
This projector screen paint is made with the intention of optimizing viewing quality.
There’s all kinds of shades and colors, but the kind that’s best for you is really going to depend on the kind of room you plan on watching your content in.
An extremely bright environment might find black to be the best color for an adequate projected image, whereas the typical darker home cinema room might find white more favorable.
Another helpful piece of advice is to outline the perimeter of your viewing wall with a dark border since that can help augment the perceived contrast in your image, making it look more vivid.
It can also temper any potential light bleed, which can distort the presentation of your image.
Should You Put Acoustic Panels Behind Speakers? (Explained)
Yes acoustic panels should be placed behind speakers to help smooth out the sound quality in the room. That’s the best location to reduce reflective sounds coming from the part of the room with the highest pressure — which is often the front.
Acoustic treatment is a topic not emphasized enough in home theater I feel.
For example placing acoustic panels behind speakers, when done right, can benefit their performance in your room.
So today I wanted to give you a guide on not only what that entails, but how you can ultimately implement acoustic treatment for better sound in your small or large entertainment room.
That way you better understand the benefits of putting sound panels behind your speakers — whether they’re floor-standing or smaller models.
There’s a lot to cover though so let’s get to it.
What Is Acoustic Treatment
Acoustic treatment to put it simply, is the implementation of some sort of object or configuration made with the purpose of diffusing or absorbing sounds in a space.
These treatments can come in many forms, and it isn’t uncommon for some spaces to need a combination of solutions to achieve sound quality that’s optimal for that particular space.
Bass traps and acoustic panels are 2 of the most popular implementations.
Taking the time to properly ensure a room is a acoustically treated is a great way to effectively improve audio quality.
Why Acoustic Treatment Is Important
Acoustic treatment is important because it can literally mean the difference between a sound that’s underwhelming and one that sounds absolutely amazing.
Often times this is something that tends to be skipped, but even in a home theater that already sounds great, this can help to elevate it to the next level.
There’s typically 3 forms of sound that you’re trying to treat when doing this process; reflections, reverberations, and resonance.
Although all 3 are important to mitigate, reflections, at least in my opinion, are the most egregious and crucial to deal with.
One of the most common reflections that occur are called SBIR (speaker boundary interference response)
This is a form of acoustical distortion that happens when a speaker is close to some sort of boundary which includes walls/floors, & even the ceiling.
The reflection from this hard surface then creates a delayed mirror image of the sound that emanates from that speaker.
These are most common in the lower frequency and can lead to an uneven sound where some parts of the room are boosted while other parts are quiet.
What makes it worse is there can be multiples of these reflections depending on the amount of speakers/subwoofers you have.
These can lead to lobbing, comb filtering, etc which can disrupt the level of immersion you experience.
However, suprisingly enough, it’s actually possible to over do it and do too much treatment to the room which can lead to the room sounding smaller than it really is.
Finding the right balance where there’s still a slight amount of liveliness but not to the point where there’s an echo is key.
Ways You Can Implement Acoustic Treatment
Using Acoustic Panels
You may have seen these used by recording artists or streamers, but basically acoustic panels are a great way to help reduce reflections in the room and improve sound.
They absorb unwanted frequencies and reverberations that can typically cause an echo.
By dampening unwanted noises, these panels are an easy way to improve audio characteristics of a room.
Made from any number of various types of light weight foam or fiberglass, sound waves travel into this material and get trapped — reducing the amount that actually reflect back into the room.
Since this foam works off of air movement, it travels through the material and creates friction, which changes the energy and slows it down.
That leads to absorption.
These panels are typically effective for smaller bookshelf speakers and monitors.
It’s important to keep in mind though that they aren’t the most effective at absorbing the unwanted low frequency sounds that larger speakers and subwoofers emit.
That’s where bass traps come in.
Implementing Bass Traps
Dealing with lower frequencies can be a lot more difficult due to the sheer size and energy these particular sound waves carry.
This causes them to be omnidirectional, meaning it travels in every direction irregardless of the direction the speaker driver is facing.
But to make it simple, you can think of bass traps as an effective way at dealing with these issues in the lower frequency response.
Low noise split air conditioning is another way to ensure proper sound quality in the room.
By using these in combination with other tips talked about here, you can prevent sounds from leaking or entering through air ducts and vents.
Implementing Helmholtz Resonators
Helmholtz Resonators, while not typically used in the household setting, are basically a small circular apparatus with varying use cases and can sometimes help with sound.
They can be helpful in dealing with different frequencies depending on their specific shapes and size.
Installing Ceiling Clouds
Ceiling clouds are pretty cool in my opinion since they’re a way to acoustically treat a larger room.
They’re usually placed in larger rooms from the ceiling, and help with the sound waves that may reflect up there.
They come in many different styles and materials.
Using Acoustic Sealant On Cracks & Crevices
Another thing to keep in mind is that sounds can escape through even the most minute of cracks and crevices.
This can alter the acoustics of the room more than you’d initially think.
Acoustic sealant is a useful remedy to this, and can be used to further isolate and lessen the transmissions of sound through things like corners and windows.
Identifying Reflection Points With The Mirror Test
Finding places where soundwaves from your content might be reflecting can be identified by using what’s called the mirror test.
Basically while sitting in the main listening position, someone else would walk along the wall with a small mirror until you see the speaker in the mirror.
Have them mark that spot with a small piece of tape.
That’s the main reflection point of that specific speaker.
You’ll want to do this for each of the main 3 front speakers, and place panels at each of the marked spots.
Using Diffusers
Diffusers are helpful in that they can help reduce soundwaves to achieve a better acoustic balance in a room by dampening it.
This can be a good balance since acoustically treating to much can lead to the room sounding too quiet if over done.
They can be helpful for keeping a space sounding more lively, and can be used in combination with sound absorbers.
Where Should Acoustic Panels Be Placed? & What To Keep In Mind
Taking Into Account Height Of The Room
The height of the room will have an influence on where acoustic panels should be placed.
However the higher the ceiling and more irregular the shape of the room, the more complicated things get.
As a general idea, you’ll want to place each panel on opposing walls in pairs around the perimeter of the room.
If you figure 2 for each speaker in a 5.1 channel setup, then that equates to 10 panels being effective.
However that can, and most likely will vary but it’s just a general idea.
For example, placing panels where 2 surfaces meet, or in dihedral corners, is a good way to further isolate the sound to just that specific room.
Spacing Of The Panels
Spacing of the panels will obviously depend on how large they are, but also what you’re using them for.
In a recording studio for example, panels should cover nearly 100 percent of the wall.
However in a typical home theater, they’ll be used much less — and even less so for a smaller home theater.
A helpful tip is to keep at least 1/2 an inch to an inch of space behind fiberglass sound panels.
The reason for this is the sound waves will travel through the panel, go through the air gap behind it, hit the wall, then go back through the panel in the other direction.
This effectively allows it to mitigate these sound waves even further.
Bigger Rooms With Higher Ceilings
Elongated rooms, rooms with irregular shape, and ones with high ceilings will likely require a different level of treatment than a smaller room.
This is because as sound rises, it spreads out and reflects downward though it is possible that the sound wave can also not have enough energy to do this, and simply dissipates.
This happens when the frequency is lower, or when the ceiling is really high where it can’t reach it.
If it’s a longer room, it’ll also require more panels due to their simply being more surface area for waves to reflect off of.
Ceiling clouds like we talked about earlier can be a helpful apparatus in improving the acoustics.
Even though all ceilings are technically reflective, the higher that ceiling is, the more necessary treatment may become.
Placing Panels Behind Speakers
What about behind speakers like in our original question, should panels be placed there?
Well here’s what to remember.
The front of the room, in the area that’s between your wall and your speakers is typically the highest pressure area in the room.
This is because not only do these front firing speakers fire their sound forwards, they also emit indirect sounds from the sides and back of their cabinet.
From there, early reflections as they’re known, arrive at your ears soon after the main sound from your content.
This can mess up imaging and articulation in the small details.
So by placing sound absorbers behind the speakers, it helps to mitigate this issue.
A common descriptor you’ll see on panels is something called their NRC rating.
The NRC rating (noise reduction coefficient) is basically a quantification of how well a material does with reducing and/or absorbing sound.
It’s measured on a scale from 0.0 to 1.0 and the closer towards 1 the NRC rating is, the better it is at absorbing that sound.
However, you want to make sure the panels or device you use (such as bass traps) interact with pressure waves and not air waves/movement.
That’s because the lower frequencies are pressure waves and are what usually causes the issues.
But if you use something that deals with air movement, this can potentially hamper sound quality since the higher frequencies from your speakers might be affected.
This is where diffusive panels can also be helpful as they simply act to reroute the sound rather than get rid of it.
As to which is the better application really depends on your room as a combination of the two may be best.
You can always try moving the speaker closer and farther from the wall to see how it interacts with it, but you’ll likely still want to implement at least one kind of treatment in this particular area.
Without a version of sound treatment, some level of distortion will always be present.
So to answer the original question, panels work great when placed behind speakers to put it simply.
However that’s actually not the only place they should go for optimal sound quality.
Behind The Television
Similar to the reasons given for speakers, you should place panels on the side and if possible, behind the television as well.
Sound waves can collide or interact with each other to a high degree, and by implementing these panels here, they can help to improve your sound quality.
How Many Acoustic Panels Do You Need?
The number of panels you need depends a wide variety of factors.
But to generalize, 2 for every speaker is a good starting metric to guage things (but again, that’s dependent on the room)
Diffusion Or Absorption Behind Speakers?
So should you use diffusion or absorption behind speakers?
If it’s a panel or technology that deals with pressure, then absorption typically works best.
Otherwise it may be smart to go with panels that offer diffusion.
Do Acoustic Panels Actually Work?
As long as acoustic panels are implemented properly, using the aforementioned & subsequent tips in this article, acoustic panels absolutely work.
What Acoustic Panels Are The Best?
There’s so many types of panels that it really depends on the type of panel, the material, room size, speaker count, etc.
With regards to how you mount acoustic panels, that again depends on the type you’re using.
A lot of times though, there will often be an adhesive back on the panel where they can be simply attached to the wall.
Final Thoughts
So hopefully this clears up whether or not acoustic panels should be placed behind speakers.
To summarize, yes they absolutely should, along with being placed on areas surrounding to help smooth out the sound quality in the room.
Sound waves tend to reflect, resonate, & reverberate — and if you can properly place these panels in the right spots in the room, these should be greatly diminished.
I’m sure you’ve already gathered from the title what the focus will be today.
This is the PHEANOO P15 soundbar review, a look at a 2.1 channel soundbar that actually manages to impress with its abilities.
But what does it offer and is it the right soundbar for you?
Let’s find out!
PHEANOO P15 Review
The PHEANOO P15 is an awesome 2.1 channel soundbar system who’s latent performance belies its stout appearance. It’s a great fit for the casual listener who isn’t concerned with surround sound but still desires quality audio. Surprisingly proficient bass, easy setup, and Bluetooth capabilities make this an easy recommendation!
When taking a look at the PHEANOO P15 soundbar, the first thing you’ll probably notice is just how small it is.
At only 16 inches across, it’s a really compact soundbar.
In fact, PHEANOO states that it’s about the size of a keyboard which I feel is a fairly accurate assessment.
In terms of design language, it definitely goes for a simplistic yet practical approach.
On top of the device you have your manual controls for the Bluetooth, volume, play/pause, & the power with a small PHEANOO branding above that.
There’s a black metal grille that wraps part way around the chassis, and the soundbar itself is made of plastic.
It feels solid though, and while not heavy, it still feels quality.
The same can be said of the subwoofer; which at height of about 14 inches nicely compliments the soundbar.
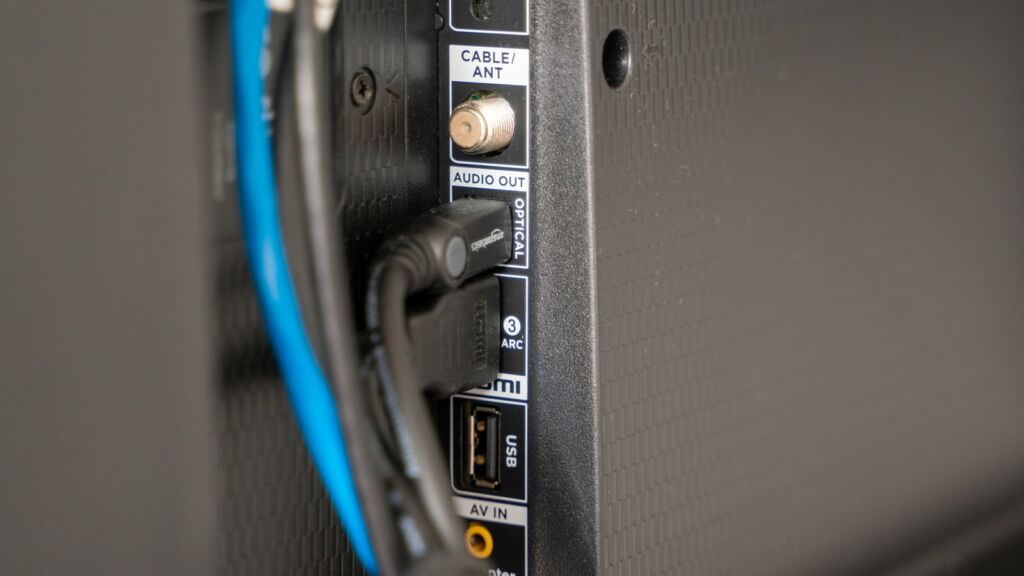
On the back is the connection inputs that include optical, auxiliary, USB, and HDMI ARC.
There’s really not much else to say from a design standpoint to be honest. It’s a small, low key looking soundbar that definitely blends in a majority of rooms.
In fact, there’s a good chance you might even forget it’s there until you hear it.
So to summarize, aesthetically speaking, it’s a really nice looking soundbar.
Features
Bluetooth 5.0 Support
With support for Bluetooth 5.0, enjoy all your favorite music and content wirelessly from your smart device.
Easy Setup
The Pheanoo P15 is easy to setup thanks to its multitude of connection options, and even turns on & off when the TV does.
140 Watts Of Power
With 140 watts of power, enjoy room filling sound
Included Subwoofer
With an included subwoofer, deep bass helps to elevate the experience.
3 Different Sound Modes
3 different sound modes, dialogue, movie, & music allow you to tailor your sound to your content.
Helpful LED Indicator
A helpful LED Indicator automatically dims and can be turned off by pressing the button denoted by indicator on the remote.
Can Be Wall Mounted
The P15 can also be wall mounted for even further convenience
Small Size
At 3.8 x 16 x 2.9 inches and about 10.41 pounds, this soundbar easily fits in a variety of entertainment setups.
Includes Connection Cables
The cables you’d need to connect the soundbar are present and include an HDMI cable, 3.5mm to RCA audio cable, and a power cable.
How To Set It Up
Setting up the P15 is really simple thanks to its multitude of connections.
If you wanted to connect it to the television, thanks to HDMI ARC, all you would need to do is connect the HDMI cable into the input labeled HDMI ARC on your television.
For Bluetooth, simply press the button and pair it with your smart device.
So how does the PHEANOO P15 actually sound though?
Really clear.
In fact, it caught me off guard because I didn’t expect it to put out the level of sound it did at such a small size.
It wasn’t so much the sound quality since I figured it’d probably sound decent, but the sheer volume it can reach.
This thing can get loud, and didn’t seem to distort much at higher volumes.
Though I did notice the mids seemed to become more subdued at higher volumes.
But I have more thoughts when it comes to the sound so let’s dive deeper.
Its Performance With Music
With music, the soundbar really shines I feel like — and provides a fun level of dynamism that really brings songs to life.
In the music mode in particular, I noticed that the mixture between bass and treble was balanced, which made it a real joy to listen to.
Instruments sounded articulate with a clarity that didn’t fatigue in extended listening periods.
Vocals sounded lifelike and immersive, adding emotional layering to songs.
The bass is what stuck out the most though as it had incredible levels of impact and offered spectacular depth.
It didn’t distort or sound boomy either. It was just good clean bass.
I liked that this subwoofer was wired too because sometimes wireless subs can lose connection or cut out.
With this one, you don’t have to worry about that.
I will say though I do kind of wish it would have had the ability to extend the wire length via RCA rather than proprietary solution it uses.
There is a separate extension cable from PHEANOO though it’s separate.
But given the integrated one is 7.5 feet, it’s likely enough for the average entertainment setup.
Bluetooth also worked perfectly, and I didn’t experience any issues with connecting.
Audio quality using it was solid, and the range seemed to be about 32ish feet.
Even the remote was simple to use and worked fine although it didn’t come with batteries (it uses AAA)
Music in general though was a highlight.
With Movies
Movies I have to say are also really enjoyable with this soundbar.
Now it’s not going to outpower a dedicated surround sound home theater or anything like that.
But for the average listener that just wants to watch movies in the typical sized room, then it’s definitely a solid option.
The bass in particular again was the star as it gave depth to movies in a way that I was genuinely surprised.
It definitely seems to punch above its weight.
But that sentiment goes for the soundbar too.
When it came to speech, it represented dialogue in a way that easily surpasses the average TV speakers.
One of the worst things is having to rewind because you didn’t hear what someone said.
Luckily these help avoid that.
Dialogue sounded natural, and didn’t impose itself above the other frequencies.
It all seemed like a balanced presentation.
Even delicate sounds in the treble range were detailed and blended nicely into the mix.
Now it can’t replicate the experience of surround sound though since the sound only emanates from the bar itself — so if that’s a concern that’s something to keep in mind.
But the quality of the sound that is there is honestly really solid.
I would say that the P28 has more range in the low end though due to it being more powerful with 160 watts, but the P15 still does its thing.
With TV
If you’re looking into this soundbar because you need something to replace your TV speakers, this is definitely a good choice.
Just watching TV with this compared with the integrated speakers feels like a massive step up despite it’s small stature.
Dialogue is crystal clear, and makes something like sports feel immersive.
Yes you can stack home theater subwoofers as it offers a 6 decibel increase in output. However doing is isn’t a remedy for an inadequate sub, since it can’t lower the frequency of the bass. You also lose out on smoother & more even bass response when stacked, as opposed to the typical opposite corners dual configuration.
Can you stack home theater subwoofers?
This might be a question you’ve wondered to yourself; especially if you’ve ever been to a movie theater or concert and happened to see this.
But what’s the reason this is done, and could you see any benefit in doing this with your own setup?
Let’s find out!
Why Someone Might Want To Stack Their Subwoofers
To Save Space In The Room
One reason why you might be tempted to stack your subwoofers is it simply saves space.
Let’s face it, subwoofers can be pretty large, and when you use 2 that only adds to the problem.
In a smaller room this can be especially inconvenient as it means you have less room for everything else and to simply move about.
That’s not even accounting for the fact that because every room, and every subwoofer, is different, the ideal place where that subwoofer sounds best might be in a location where it’s simply in the way.
I remember when I was calibrating one of my subs, the ideal location for it was in a place where it just wouldn’t work.
From there I had to compromise by placing it somewhere else.
So for some, placing one sub on top of the other might just be more convenient in terms of saving space.
An anti slip mat cut to size and placed atop the bottom subwoofer can be helpful to secure the top subwoofer in place.
They Think It’ll Give Them More Output
Another reason you might try stacking them is you feel that doing so might give you increased bass output over using them individually in separate locations.
This line of thinking is certainly true to an extent, but due to the way bass works, it’s also not that simple either.
This can vary widely depending on many factors which we’ll get into shortly.
What’s The Benefit In Stacking Home Theater Subwoofers?
As you probably guessed, there is actually some benefit in stacking your subwoofers.
6dB Gain In Output
The first major benefit you gain when stacking 2 subwoofers comes in the form of increased bass output.
In fact, when stacked, it can give about a 6 decibel increase in the volume of bass you get.
This can be a very noticeable jump in the amount of force and depth the bass might seem to gain.
It could also help bring out those infrasonic ranges in the subwoofers that can output below an audible range.
It’s important to remember that when it comes to bigger rooms, how low in extension the subwoofer can go only amounts for so much since what really makes the difference is how loud the subwoofer can actually get without distortion.
Some may prefer to stack their subs rather than opt for a bigger sub with a higher RMS since that might not always be applicable for every person.
If you notice that your subwoofer sounds great but doesn’t get loud enough, getting a second one and placing it on top could be an option to fix it.
Can Offer More Head Room With Less Distortion
Briefly mentioned this, but another benefit to using 2 vertically stacked is you get more headroom in your output.
When using 2 subwoofers, and especially when stacked, there’s less strain on the amplifier at the same volume.
That means it doesn’t have to work as hard, allowing you to get a louder and cleaner bass volume with less effort.
This is not only good for the longevity of your equipment in general, but for the quality of your audio as a whole.
Additional headroom is definitely a good way ensure things don’t become distorted at those higher volumes and ensures your bass drivers last for a long time.
Can Indirectly Help With Port Noise
Another upside to stacking your subs has to do with the noise they produce.
I’m not talking about the bass, but of any unwanted sound that the physical cabinet or internal components might make.
Whether it be from playing the volume too loud or the driver of the sub itself not being up to par, certain subwoofers can make external noise when they’re pushed too hard.
This is especially apparent if it’s a subwoofer that tries to play below its noted frequency range at extreme volumes.
By using 2, they basically don’t have to work as hard individually which can potentially alleviate this issue.
When Should You Stack Your Subwoofer?
It’s all preference really, but if you have a smaller room, then stacking subwoofers might be a viable option to save on space.
Though that being said, there are some caveats to doing so.
Are There Downsides To Stacking Subwoofers?
You Lose Out On Smoother Bass Response
What’s really important to mention is that stacking subwoofers means you lose out on the benefits that dual subwoofers give you.
Now I’ve talked about it before and even did an entire guide on it, but basically when you use 2 subwoofers, it helps to smooth out the frequency response at multiple listening positions in the room.
That means if there are any nulls or zones where it seems like there’s a lack of bass, using a second one in that position can get rid of that.
You can’t do that with stacked.
While them being placed within 1/4 of a wavelength won’t introduce any nulls, it won’t help to get rid of the ones that already exist in the room either.
It Could Make Things Sound Boomy
Another thing that could happen is while it could offer a volume boost in your room, depending on where they’re placed, it could potentially increase your volume by too much.
Whether it being reinforcement from corners, or an overlap in sound waves, it’s always possible that stacking your subs actually gives you a worse bass quality.
Plus, if placed properly, you can still get the volume boost that 2 subs on top of each other would give you, separately.
Is There Anything Stacking Subwoofers Might Not Help?
Already mentioned this, but stacking them won’t improve any holes present in your soundstage.
The bass might sound stronger this way, but if there’s any deadzones, it won’t get rid of them.
This can result in an experience that’s inconsistent for listeners in the room.
Simply put, subwoofers tend to sound better when they’re spaced out.
I will caveat this though by saying one of the few times this isn’t true is when you use multiple stacks of subwoofers.
In that case, you’d be getting more output and improved bass response.
That would then technically offer the benefits of both.
Subwoofers Stacked Or Side By Side?
Now should you use them stacked or side by side?
Again this is going to depend on the room as well as where the subwoofer crawl dictates you place them, but generally it’s not going to matter too much in this case.
Given that they’d be in such close proximity to each other, it would make too much of a difference either way.
Both ways would sound similar.
Final Thoughts
So that about wraps it up for this one.
In short, yes you can stack subs, but it’s generally better to just place them in their ideal spots and enjoy the improved bass quality that dual subs gives that way.
Plus, there’s even the chance that it has just as much of a volume increase that stacked would give while sounding better overall.
You’ll just have to experiment to see what works best for your listening conditions at the end of the day.
But that’s really all I have for now.
Leave a comment below letting me know what you think, or even if you have any questions that you’d want to know.
Can you stack bookshelf speakers? It’s a good question really, and might even be one you’ve pondered at some point or another.
But is it actually something that’s viable or even makes sense?
Let’s find out.
Can You Stack Bookshelf Speakers?
Yes you can technically stack bookshelf speakers, though doing so isn’t a great idea. While it may initially save space and even offer a volume boost of 6 decibels — interference, sound wave cancellation, even comb filtering/lobbing can occur. The exception is when dealing with 3D object based audio, since dedicated speaker modules should be placed atop front soundstage speakers.
Reasons Someone Would Want To Stack Bookshelf Speakers
To Save Space
One reason why someone may want to stack their speakers is they’re simply pressed for space.
Home theaters obviously vary in size since every room is different, and a sound system in a larger hifi room might avoid the issue of space.
But in a smaller theater room, you might feel the need to stack your bookshelf speakers to save space.
This of course depends on their size since doing this with say, a tower speaker, may not be realistic.
They Believe They’ll Get Better Output
Another reason someone may try to stack their speakers is they’re of the belief that because they’re using more speakers in tandem, that they’ll get better output overall.
Surprisingly that’s actually true, but we’ll touch on this aspect in a bit.
While I could see why someone would be tempted to do this, it doesn’t take into account the potential drawbacks it could cause.
More isn’t always better, and in this case, there may even be a few caveats to using them simultaneously in this way.
The earliest account of speakers being stacked came from a pair of speakers called the Large Advent Loudspeaker that many regard as one of the greatest speakers ever created.
Henry Kloss founded the Advent Corporations and launched the pair of loudspeakers in 1969 with nearly instant feverish acclaim from the masses.
His original goal was to build a projection television however this eventually progressed into him developing the first pair of these iconic speakers (which would later be introduced in the smaller variant)
In spring of 1973, a publication called The Absolute Sound first talked about what became known as the Double Advent System.
This basically entailed stacking a pair of the speakers atop one another, tweeter to tweeter, as a way to enhance the overall sound quality.
This was something completely unheard of at the time.
However this configuration would later go on to gain illustrious praise from audio publications & the public alike.
Even to this day, these are one of the very few speakers recommended as both a single pair and a stacked pair due to their impeccable sound quality.
These speakers are basically where the idea of stacking speakers comes from in a nutshell.
However unlike most speakers, these actually improved when used in doubles.
Are There Any Issues With Stacking Bookshelf Speakers?
So what happens when you actually decide to stack bookshelf speakers?
Well besides the fact that it’s definitely not something that’s recommended, you can run into all sorts of issues when it comes to the audio quality.
Lobbing
One such issue you might encounter is lobbing.
Lobbing is basically when the same sound arrives at the listener’s ears at slightly different times in close proximity to each other.
This can cause certain sound waves to cancel each other out while others get reinforced and peak.
So when you place a speaker on top of another, you lose varying levels of fidelity in the quality of the audio.
Comb Filtering
Comb filtering while similar to the lobbing, is basically how the listener perceives the sound at a certain axis.
Think of it like the result of lobbing.
Various wave cancellations and peaks cause the audio to seem uneven and distracting.
These dips in frequencies also resembles a comb on the frequency chart (hence the name)
When placing 2 speakers on top of one another, it’s likely you might experience some form of comb filtering depending on your room.
Worse Off Axis Performance
Similar to what what happens when you use 2 bookshelf speakers for a center speaker, stacking 2 speakers atop one another would give listeners off axis a generally worse experience.
Due to inconsistencies in the output, listeners off to the side would likely experience peaks and dips in volume that would really not provide a pleasant experience.
This would become more apparent in side sweeps when the sound pans from left to right, where you would almost notice holes in the sound.
Can You Avoid Problems With Stacking Speakers?
So with all of this being said, is there anything you can do to mitigate any of these problems.
Again I wouldn’t really recommend it, however if you’re determined to still try then there are a few things you should keep in mind.
One thing to remember is an old adage in speaker placement that certainly applies here.
The speed of sound divided by the center to center distance equals the highest frequency that both speakers should play together.
Placed at about 1/4 the wavelength distance, the speakers shouldn’t entirely cancel each other out.
In other words, taking the speed of sound in inches, and dividing that number by the distance between one driver on your bookshelf speaker and the other should give you an idea of what frequency you’ll run into issues.
The resulting number denotes this.
You could also place the top speaker upside down on the bottom one so that that waves aren’t interacting with each other negatively.
Surprisingly there is actually one benefit to stacking speakers that comes in the form of a volume boost.
In fact when placed together, there tends to be a 6 decibel volume boost that occurs.
While it might even boost bass output of the speaker, considering the actual quality of sound can degrade, it’s not really a worthy tradeoff.
Multidimensional Sound Through Speaker Modules
There is one application where speakers can be stacked and that’s when using speaker modules.
These modules are specialized speakers designed to sit on top of your front speakers.
Their primary purpose is to reflect sound waves off the walls to your ears to provide an almost 3D sound field around you.
They typically utilize object based sound formats like Dolby Atmos & DTS:X, and are a respectable substitute for actual ceiling affixed Atmos speakers.
So to summarize, while you can technically stack speakers, it’s probably not a good idea.
You’re better off either substituting with larger speakers if your concern is proper volume output, or using an extra pair of height speakers angled downward towards the listening area.
But there’s always the off chance that it actually sounds decent so you’ll have to see how everything interacts with your particular room.
Can I Use 2 bookshelf Speakers as a Center Channel?
I remember being previously asked the question of if 2 bookshelf speakers could be used as a center channel.
This led me to wonder how many people might have tried to do that or something similar.
So I figured I’d answer this very question in detail to hopefully shed some light on whether it’s a good idea to do this — along with whether a dedicated center channel speaker is better for quality sound.
Let’s find out!
Can I Use 2 bookshelf Speakers as a Center Channel?
Using 1 speaker as a center channel is acceptable as 3 identical speakers in a line array can produce a more realistic result when the sound pans from one side to the other. It generally isn’t a good idea though to use 2 bookshelf speakers as a center channel since audio cancellation can occur from nulls.
The Function Of A Center Channel Speaker
Just to reiterate, a center channel speaker’s function is to reproduce a large portion of the dialogue and sound effects present in the content.
In fact, it can in some cases be tasked with up to 80 percent of the sound mix.
This makes it an extremely important component in a home theater since a good center channel speaker will immerse you in your content.
The kind of speaker you use as a center channel speaker though will depend on your listening conditions, the quality of that speaker, the type of left & right speakers you’re using with that center, and even the amount of power they have.
Equally important is the right center channel speaker placement in your home theater.
These are important things to remember — especially if you’re thinking about using a bookshelf variant as a substitute, since there are various do’s and don’ts to keep in mind.
Using 1 Bookshelf Speaker As a Center Channel Speaker
So is it a good idea to use a single bookshelf speaker as a center channel speaker?
Yes if you don’t have a dedicated center, using a bookshelf speaker of the same model is perfectly acceptable.
In fact some audio professionals and even Dolby Labs use this configuration for their audio.
The biggest between the two is that traditional center speakers will have two mid drivers and a tweeter.
Whereas a single bookshelf speaker will typically have one.
This can have implications as far as the reproduction of certain frequency ranges, but even that’s dependent on the exact equipment you have.
If you do use one in this manner, it’s highly recommended that it tonally matches the other 2 front speakers to maintain a cohesive soundstage.
It’s particularly important that the speakers are of a similar make and model to uphold seamless audio quality.
Otherwise that sense of immersion falls apart when sounds pan from left to right.
The only reason bookshelf speakers aren’t used as often is because the horizontal orientation of center channel speakers often better accommodate for space when accounting for sufficient space in a home theater.
A vertical speaker is not practical a lot of the time since a vertically placed speaker would likely block the screen; so people simply opt for the alternative.
But surprisingly, using 3 of the same speaker for the front stage can actually work better in some cases — even offering better uniformity.
That’s not definitive though, as there’s so many factors that can influence this either way.
Ultimately you’ll have to listen for yourself to see how it sounds in your particular environment.
Where To place The Bookshelf Speaker If You Use it For The Center Channel?
However if you do try this, don’t place the bookshelf speaker in the middle of this configuration on its side.
Not only is it not designed for that, it can also cause issues with audio quality.
This can cause the sound to seem inaccurate and inconsistent where sometimes it might sound fine where other times it might just seem off.
You want place the speaker right side up and as even with the L&R speakers as possible without blocking the screen.
More specifically, the reason why center channel speakers can be placed sideways while bookshelf speakers can’t has to do with their very design.
When you place a speaker sideways that only has 1 driver and 1 tweeter, the sound dispersion gets shifted causing peaks and dips in volume, problems with the crossover, etc.
This basically causes problems with the resulting audio quality.
You can technically aim the tweeter at the listener in the sweet spot (the ideal listening area) to help mitigate this, but the problem is any listeners off axis would then experience lesser audio quality as a result.
Center speakers bypass this crossover issue common with horizontally aligned speakers by implementing a WTW (woofer, tweeter, woofer) design.
This basically allows the listeners in the middle, and off to the side, to experience the same high quality audio by dispersing sound evenly around the room.
So long story short, while you can use a single bookshelf speaker, I would recommend leaving it standing up vertically rather than laying it down.
As a sidenote, make sure you set your speakers to small in the receiver settings rather than large.
Large is typically better suited for speakers with driver sizes of 6.25 inches and up.
Setting it to small and to 80hz ensures proper crossover with your subwoofer giving a better blending of sound across the frequency range
Using Two Bookshelf Speakers as a Center Channel
Now what about the original question, can you use 2 of them instead of just 1?
Honestly I’d advise against it.
The problem that arises when you use 2 bookshelf speakers rather than 1 is sound cancellation can occur due to what’s known as lobbing and comb filtering.
These are basically time delays in the frequency range caused from 2 drivers radiating those same exact frequencies.
Using 2 speakers for this application would simply cause issues with nulls and boundaries around the room.
Having 2 of the same speakers stackedwould also only raise the the dB output by 3 at most, and would simply do more harm than good.
A single speaker would have ever so slightly less output, but would sound much better overall.
Is a Bookshelf Speaker Or Dedicated Center Channel Speaker Better?
But if you have the option of both, is a dedicated center channel or a bookshelf the better choice?
Not to sound cliché but it depends.
Hypothetically speaking, because of the fact the traditional center has 2 bass drivers rather than 1, it’s likely to have better output in certain lower frequency ranges than the bookshelf will.
That’s not a guarantee since it really depends on the speaker, but since center speakers are generally bigger, they’re often capable of more.
However that sentiment changes when using floor standing speakers because in that case, there’s a decent chance that those could be better.
Using 3 of the same speaker would have the additional advantage of the most accurate timbre matching which could portray things like voices and dialogue more realistically.
But like I always say, your room type holds a massive bearing on how any of this truly shakes out.
For example in a media room that’s sound treated, the speaker would likely have a different sound than being in the average living room.
Really it’s going to be down to preference because there’s so many factors, the only way to definitively know is to test for yourself since that same speaker could sound different in 2 different rooms.
Besides depending on the room, the kind of setup you plan on doing is important too since some even opt for their center channel speaker in their ceiling when using overhead speakers, or using a center channel speaker stand for further clarity.
Some even have their center channel speaker in wall to be able to enjoy surround sound while still retaining their space.
Can You Skip Using A Center Channel Speaker All Together?
But what if you wanted to enjoy home theater without a center channel?
Could you just skip one all together and opt for a 2.1 channel setup?
Interestingly enough you actually can.
This is called running a phantom center, and what happens in this case is your mains in the front will take over and replicate the same sounds that the missing speaker would be originally tasked with.
A lot of modern receivers have this virtual center feature and balances volume between the left & right channels to provide convincing spatial imaging.
While you would lose some imaging with this particular usage of stereo sound if you sat off to the side, it wouldn’t be so bad to the point where it’s unlistenable.
The main advantage with using a dedicated physical one though is a wider sweet spot in terms of listening area.
For music it’s perfectly fine to forgo one, but for movies I would still personally recommend a center channel.
Seating and placement of front left & right speaker is still important regardless though, so here’s a calculator I created to help in that regard.
Final Thoughts
Hopefully this answers your original question regarding using 2 speakers for one center channel.
In short, it’s not a good idea, since it can cause issues with sound waves cancelling each other out.
It’s better to either simply use 1 orientated vertically, or use a traditional center channel speaker.
Anyway since that does it for this one. Until next time.
Can I Leave My Subwoofer On All The Time? (Revealed!)
At some point you may have wondered, can I leave my subwoofer on all the time?
It’s definitely a good question to ask since home theater can be a complex topic and one that seems to often be changing.
So with that said, the answer to that question is actually really interesting since it depends.
Let’s get to it!
Can I Leave My Subwoofer On All The Time?
Yes you can leave your home theater subwoofer on all the time as long as it properly utilizes an auto standby feature. Subwoofers in standby last longer & use less power. However older subwoofers that don’t have this function should be turned off when not in use as electricity escapes in the form of heat, causing the amplifier to get hotter than normal.
Reasons You’d Want To Keep Your Subwoofer Powered On
Convenience
So one reason why you might want to keep your subwoofer powered on is it’s simply more convenient.
Having to get up to manually turn the sub on every time you want to watch a movie can become an annoyance rather quickly.
With it remaining on, you don’t have to worry about constantly toggling it on and off.
No Need To Access The Power Toggle
Another reason for leaving it on is you won’t have to constantly access the power toggle to power it on — especially if it’s hard to reach.
If your subwoofer is setup in a way where it’s placed up against the wall or is situated behind something, accessing the back panel of the unit can be difficult.
You may even move an adjustment dial accidentally when attempting to power it on, which would then throw the entire sound signature out of whack.
Simply leaving it on forgoes that all together.
When Can You Leave Your Subwoofer Powered On?
Has An Auto Standby Feature
However there’s a lot more nuance than for me to just broadly recommend leaving your subwoofer on as there’s a few things to keep in mind.
The most important thing to remember is you’ll only want to leave your subwoofer on if it has what’s called an auto standby feature or auto/on.
Auto standby is basically a feature included in most modern subwoofers that turns the device on automatically when it senses the actual signal coming to it.
When it no longer detects that same signal after a period of time (typically around 15ish minutes or so) it’ll go back into standby mode to save power.
This is helpful because not only do you not have to worry about constantly turning the subwoofer on and off which can prolong the life of it, using auto standby also turns the unit off automatically when it’s not being used.
It also uses less electricity.
Most modern subwoofers have this feature since they typically have class D amplifiers which are much more efficient when it comes to power.
How Can You Tell If Your Subwoofer Has an Auto Standby Feature?
You can tell if your subwoofer supports this feature by taking a look on back panel and seeing whether there’s a knob or toggle that has an off, on, and auto setting.
Turn it to auto so that the sub automatically turns on or off when content is playing.
Again the internals of most modern subwoofers usually incorporate some kind of standby feature to make things easier for the user.
Should You Turn Your Subwoofer Off If It Doesn’t Have An Auto Standby Function?
But what if you have an older subwoofer that doesn’t have a standby feature, what should you do then?
Well in the off chance that you have a subwoofer that doesn’t support this feature, I’d recommend turning it off honestly.
I say this because if it doesn’t have a standby function, there’s a decent chance it has a class A amplifier (especially if it’s an older subwoofer)
The problem with this is that when a sub of that type is left on, regardless of whether it’s receiving a signal or not, the amplifier inside will be running at full power.
If electricity isn’t going to the speakers, it’ll be transferred to the amplifier which can heat up as a result.
This is due to the fact that the electricity escapes as heat.
So the internals of subs without a standby mode can get hot when left on for extended periods because the the excess electricity has nowhere to really go.
Not only this, but it’ll use more power consequently.
So in short, if your subwoofer doesn’t have an auto on or standby function, turning it off when you’re not using is highly recommended.
But Does Anything Happen Over Time If You Turn It Off & On?
But does anything actually happen to the sub if it’s turned off & on?
Well there’s actually a few things that can unfortunately go wrong.
The Knob/Toggle Could Wear Out
The first thing that could technically go wrong is the knob or toggle that controls the power of the sub could wear out.
While not immediate, the more you use it, the higher the chance that over time, parts of it like a power switch could wear out and simply stop working in some fashion.
Inside Components & Wires Could Weaken
When constantly turning your subwoofers off and on all the time, the internals off the subwoofer itself might weaken.
Now whether it’s better to power cycle or leave a subwoofer on that doesn’t have that function really depends on how often you do it, the type of sub, and its quality since each one is different.
It Becomes More Susceptible To Large Surges Of Electricity
Another thing that can technically happen when constantly left on is they could be affected by the electricity from storms (typically in older subs).
While not common, it can very well happen and can permanently damage the internals of your device.
What you can do to mitigate this is using a smart power strip that only turns on when sensing a certain amount of power.
This is helpful for the units that don’t have standby because it’ll turn off the sub when not in use while protecting the circuitry from anomalous electrical surges.
Some even have outlet timers to turn electronics off after a certain period of time to save energy which is helpful (not to mention pretty cool in my opinion)
How Long Does A Subwoofer Last?
So then with all of this said, how long does a subwoofer last?
Well the answer to that depends on a number of factors including how well the subwoofer cared for in the room it’s in, the materials of the sub’s cabinet, the materials of the driver (being that rubber is more durable than foam), the environment of the room it’s placed in, the volume it’s played at, etc.
I wouldn’t say there’s any one specific answer since there’s so many different factors that could affect it.
From my experience though, I’ve found that with proper maintenance, if a subwoofer is high quality, it can last many years (often 15 years plus barring any defects)
Sometimes it can even be a lot longer.
But again it really depends since that length of time can be longer or shorter due to it really depending on the subwoofer itself and how well it’s taken care of.
Final Thoughts
Hopefully with this article you now have a better idea of when it’s best to leave a subwoofer on and what steps you can take to prolong the life of your sub.
As long as there’s a standby feature, it can be left on as long as it’s properly cared for.
In this Presonus Eris E3.5 Nearfield Studio Monitors review, we’ll go over how they sound and whether they’re the right pair of speakers for you.
Having used many speakers over the years, I figured it might be helpful to share my experience with you on how they might compare to similar bookshelf speakers.
So we’ll answer all of that and more in this helpful review!
Presonus Eris E3.5 Review – A Quick Summary
The Presonus Eris E3.5s are fantastic sounding nearfield speakers that are particularly great with music. Their gripping clarity and minimal distortion makes them great for the casual listener simply wanting something that sounds good without the hassle. Their sonic fidelity is also great for desktop setups. Plus bluetooth capabilites, and their smaller stature gives them additional versatility with placement.
The appearance of the Presonus Eris E3.5 can best be described as subtle yet refined.
Up top you’ll notice the 1 inch silk dome tweeter hidden behind a black metal guard.
Under that is the 3.5 inch woven composite woofer that’s a subtle blue in color that I think looks really cool.
Towards the bottom of the speaker you’ll notice a volume knob, auxiliary inputs for mobile playback, and a toggle power button.
There’s also a small Presonus insignia to the right that adds a splash of color and flair.
On the back you have acoustic tuning knobs that control bass and treble, and under that are 2 sets of inputs – 2 balanced TRS inputs and 2 unbalanced RCA inputs.
Interestingly, amplification is only in the left speaker meaning you have to connect the included cable to the right speaker for them to both work.
It’s the reason why one speaker has acoustic controls and the other doesn’t since it’s to control them both.
The cabinet of the speakers themselves are made of a medium density fibreboard with black vinyl laminate that actually looks premium in person.
The front is made of plastic though I did notice that they tended to pick up fingerprints so you’ll want to occasionally wipe them down.
There’s also no XLR input like the higher end Eris models so that’s something to keep in mind.
They’re also pretty small in stature at 6.4 x 5.6 x 8.3 inches making them great for smaller spaces.
Over I’d say they’re a good looking speaker that blends in; though there’s no speaker grille which would have been a nice inclusion admittedly.
They have a really likeable design though, and feel solid while still remaining light weight at 6.39 pounds.
Features
Quality 3.5 Inch Drivers
Made of Kevlar, these 3.5 inch woven composite drivers output a powerful bass response. The weave pattern on the drivers specifically gives them a more balanced sound that’s also cleaner overall.
1 Inch Silk Dome Tweeters
The Eris E3.5 monitors have 2 ultra low mass silk dome tweeters that allow it to put it out crystal clear sound without any harshness. They also have a wide dispersion pattern that allows the sound to emanate more freely around the room.
3 Different Types Of Audio Inputs
Through the 3 different types of audio inputs; 1/4 inch TRS inputs, a pair of RCA inputs, and a front panel 1/8 inch unbalanced line inputs for mobile devices. you’re able to connect to pretty much any line level sources. This gives you flexibility with how you use the speakers.
Even Frequency Response
An even response makes these speakers a great choice for near field listening and continues the prestigious audio that Presonus speakers are typically known for.
Easily Adjustable Sound
With high and low frequency controls, you can adjust the sound to your liking for your specific listening conditions.
How To Set Up The Presonus Eris E3.5 Speakers
Setting up the Eris E3 luckily is pretty simple.
First take the included speaker wire and connect the corresponding red and black wires from one speaker to the other.
Then connect the included power cable. From here you can either connect via bluetooth or connect an external device to pair with it.
Turn it on and adjust the sound to your liking.
Thoughts On The Sound Quality
Initial First Impressions On Them
To put it simply, I would say that the Presonus Eris E3.5 speakers sound really great.
If anything their sound signature could be described as neutral (or at least that’s how they sounded to my ears.
Sometimes I like to see what the frequency response of a speaker is like so as a fun little experiment I decided to measure the frequency response to see what it would look like with these speakers.
Interestingly enough, there was a slight dip in the midrange that I didn’t notice by ear.
Everything else was a pretty flat line.
I thought that was pretty interesting since it wasn’t something I noticed in every day listening.
For an audio professional or recording artist, that would be something to either test for yourself or just be aware if you’re meticulous about accuracy.
I haven’t seen similar sentiments echoed on forums or reddit or anything, so maybe that isn’t even the case and it was simply my room acoustics.
But again as far as the audio quality itself goes though, it was definitely pristine, and a lot louder than I initially thought they’d be.
Everything sounded crisp and clear, and content played through the speakers was really enjoyable.
As a general overall assessment, the speakers honestly sounded great. But let’s dive deeper..
Their Performance With Music
For casual nearfield/desktop listening with music, these speakers definitely shine.
Instruments are represented with precision, and the vocals come through really prominently.
Even with regards to the bass quality, each kick of a drum or drop of a beat came through with a satisfying thud.
The bass didn’t sound muddy or lacking and was actually really substantive I felt.
It wouldn’t replace a fully dedicated subwoofer obviously, but they perform really well all on their own.
For listening to music in a larger room, surprisingly I found the speakers to still hold their own in terms of clarity.
Now I did notice a slight drop off in the force of the bass at those higher volumes, however never once did they distort which is really worth commending.
But another interesting I found was they responded to EQ really well.
The acoustic tuning controls on the speaker itself worked with adjusting how things sounded too, but using EQ software for bass and treble really opened these speakers up even more.
So It really seemed like these speakers work particularly well with equalization which is nice.
Their Performance With Movies
Their performance with movies was similar to music. Everything sounded crystal clear and immersive.
However given that the speakers only go to about 80 Hz normally, I’d definitely recommend a subwoofer if watching movies is your primary reason for considering these speakers.
Luckily Presonus actually makes really good subwoofers and one in particular, the Eris sub 8, actually pairs with these speakers.
But besides the bass aspect, the midrange and treble sounded incredible, and worked really well with movies.
There was no harsh sibilance, no hard to hear vocals — just good clean sound that was hard not to appreciate.
Are Presonus Eris 3.5 Good For Mixing?
Now are the Presonus Eris 3.5 good for mixing?
Honestly if your intention is to specifically mix and record audio, I would probably opt for the larger variant in the lineup, the Eris E5 BT 5.25 monitors since the drivers are larger and the class D amplifier allows it to output more power.
I’d say the Eris 3.5 is still good for mixing, just keep in mind the smaller drivers may not be able to output as much volume.
The BX3 monitors are technically more powerful than the Eris 3.5s so with that in mind, they technically might get louder.
But sound quality wise, the Presonus are still pretty comparable, it’s just the former gets louder.
Who Are They For?
The Presonus Eris E3.5 are for the more casual listener that just wants something that sounds good without the hassle.
They work best as nearfield monitors meaning they’re better for desktop or close range listening, rather than as a main component in a large room home theater.
Recording artists or audio professionals would probably find the E5 BT-5.25 inch a more suitable option.
Pros/Likes
Suprising clarity
Solid bass
Adjustable bass & treble
Ample volume
Easy to setup
Not very large
Nice design
Cons/Dislikes
Can’t be wall mounted
Bass rolls off at 80 Hz
Picks up fingerprints
Final Thoughts
That about wraps it up for this Presonus Eris E3.5 review.
In short, they’re great nearfield speakers for content creators or even the causal listener & manage to surprise with gripping clarity and precision.
They’re particularly great with music and have a sonic accuracy that makes them fun to listen to.
A home theater can be maintained through various means that includes checking for loose connections, watching for failed components, keeping your equipment clean, making sure components are secure, and even adjusting picture quality should it deviate over time.
Following these, and the rest of the tips in this article should help prolong the life of your home theater!
It’s probably not a stretch to assume that like me, you find home theater to be some level of fun and engaging.
But over time you may have wondered, how can you actually maintain your home theater?
Well here’s something you may not have known; over time, heat, temperature swings, dust buildup, and even electrical issues can have a big impact in the preservation of your home theater.
From connections that might become loose, to a display that might shift its color over time, a number of things can go wrong in your entertainment space that you might not even immediately notice.
Eventually, these start to have a direct impact on not only your system performance, but its overall longevity as well.
So what I wanted to do is talk about a few home theater maintenance tips that’ll hopefully help you avoid issues with your system, and keep your speakers and equipment in great shape for years to come.
These will be easy to implement and direct ways you can maintain the life of your large or small home theater setup, while further optimizing what you currently have so that you’re confident you’re getting the best home cinema experience possible.
Do keep in mind you’ll also want to monitor the following items talked about in this guide at least once a year.
That way the health of your sound system is kept in pristine condition.
This article should be a helpful reference so without further ado, let’s get to it!
1). Ensure All The Screws Inside Are Secured
Whether it’s the vibration from the speakers themselves or just general movement, it’s actually possible for the components within to loosen.
You might hear some sort of noise not normally associated with the speaker which can be indicative of this, and sometimes it might just happen and you don’t necessarily notice it.
Ultimately this may result in a muddy and stifled sound.
So to fix this, and ideally prevent this, there’s 2 things you can do.
The first is the more obvious answer of checking for any loose screws.
But besides just manually checking each speaker, another more efficient way to see if something is awry is through what’s often known in the audio world as frequency sweeps.
Frequency sweeps to put it simply, are specialized tones that run through the frequency range from high to low (or vice versa) to detect any abnormalities with your speakers, ie. (an unwanted resonance, a spike in volume, etc.)
The volume should remain the same at every frequency and if it doesn’t, then it’s indicative of an issue and could be something as simple as a screw loose in a driver somewhere.
This one is pretty simple, but occasionally check that the connections in your audio equipment are also secured.
When they aren’t, problems with audio quality and even audio volume can arise which can be problematic since things wouldn’t be performing at their optimal levels.
Also make sure that the connections on the back of your receiver aren’t touching as that can cause issues too from what I’ve noticed.
3). Watch For Any Failed Devices In Your Home Theater
Speakers and subwoofers can be especially susceptible since their voice coil & amp can potentially overheat and malfunction if played beyond their capabilities.
One way to see if a something has failed is by playing pink noise individually speaker by speaker to actually notice whether they’re functioning correctly or experiencing some sort of issue.
This can helpful with regards to ascertaining the level of functioning of the receiver and the subwoofer too.
Remember, playing your volume too loud can definitely speed up component failure so be mindful of that.
Anything higher than reference level volume especially (85 decibels) since that surpasses the agreed upon audio standards, and approaches the upper threshold of the speaker’s capabilities & general listening comfortability.
Luckily electronics equipment, especially when it comes to home theater, often have some kind of warranty included when purchased — so the manufacturer may be replace to replace it within an alloted time period if anything should happen to fail.
Plus there’s various options available with regards to extended warranties for audio equipment.
4). Occasionally Remove Dust From Your Speakers
Another thing that’s almost inevitable is that at some point dust may begin to accumulate on your speakers.
Something you may not have been aware of however is that dust not only affects the look of your speaker, but its performance as well.
Dust can infiltrate the wire connectors and disrupt the electrical signal that runs between the loudspeakers and their source, muddying the sound.
Not only that, dust can also get under the speaker grille itself.
In order to properly clean your speakers, a dry or even slightly damp microfiber clothe can be used to gently remove any dust or marks on the cabinet.
If it’s an older speaker or really bad, a tiny drop of a gentle wood cleaner should suffice.
You can wipe the other parts of the speaker too as long as long as you’re careful.
Over time and over the years, old clothe surrounds (the lining around the drivers) may dry out and become brittle, potentially tearing as a result.
What you can do to remedy this if this has happened and they are really old speakers, is taking a very small amount of silicon sealant and rubbing it into the clothe which might help strengthen the material and help it perform like it use to.
Just keep in mind to not directly touch the dome tweeters on the speaker since that can actually damage it.
If you do happen to notice dust on the surface though then a photographic lens blower can be used to remove the dust.
5). Cleaning Things Like Switches & Knobs
Analog switches & the knobs on your equipment can experience a number of issues from becoming brittle to even breaking off.
Things like humidity, moisture, temperature, and usage all play a big part in how long these particular components last.
Try to keep equipment in temperate & dry conditions to avoid corrosion.
Furthermore, test tones through your equipment like speakers, subwoofers, etc. can help spotlight potential problems with any of the dials or switches when sat close to it.
It might sound like some sort of ringing if this is the case.
Once that problem has been found, you have multiple choices.
The most obvious choice would be replacing the module with a new one, but if this isn’t possible then you can technically treat the corrosion with a cotton swap & isopropyl alcohol.
There are also many other options you can use including baking soda, white vinegar, and even lemons!
As for preventing the corrosion of these components, you also have a myriad of ways in achieving this that includes applying a protective coating, using a dehumidifier, and cleaning any accumulated dust present.
Excess dust can actually accelerate the corrosion process due to fact that dust absorbs water.
This unintentionally invites water to come in contact with these parts, which speeds corrosion along.
So by taking these steps, you can prolong the life of your equipment.
6). Using A Surge Protector Can Be Helpful
Speaking of prolonging the life of your equipment, another often overlooked aspect of home theater/entertainment is caring for the components that power it.
More specifically, implementing proper power management to protect your devices while ensuring you’re getting the best possible performance is really important in my opinion.
Surge protectors are often used to do this while, like their name suggests, protecting your stuff against things like electrical surges that might otherwise overload and potentially damage them.
This surplus of power can also cause your home theater receiver to randomly shut off too.
I also speak from personal experience since a lightning storm a few years back actually fried my equipment when I wasn’t using one.
Safe to say I learned my lesson with that one lol.
Line conditioners are also a helpful aspect of power management since some of them can actually benefit your sound by making the connection cleaner though whether it’s noticeable is of course subjective.
Still they can be helpful and sometimes there’s even devices that combine the 2 that make this an easy thing to implement.
Power conditioners are definitely helpful to consider for your equipment.
The important thing to remember when it comes to receivers is that allowing them space and enough airflow can be an integral part of them continuing to actually function correctly.
This includes remembering to never put any objects on top of them as it can block the ventilation of the unit.
Barring defects, they typically last quite a while when properly taken care of.
But what if you don’t have much room, what then?
Well then you could use some type of fan that actually keeps them cool in the space they’re placed in.
There’s many different types so you’ll want to decide on the one that best fits the particular space the unit is in and where it’ll actually fit.
8). Cleaning Blu-ray Players & Receivers
Over time, it’s likely that some amount of dust may begin to collect on some parts of your receiver and other devices like Blu-ray players and the like.
You’ll want to keep them clean so that they continue to function properly but how exactly do you do that?
Well it’s actually pretty simple.
First make sure everything is unplugged, then, using a microfiber cloth, gently wipe the outside of the device to remove any dust that may have accumulated on the outside of the chassis.
Make sure you do so gently without pressing on the device in any way.
If you happen to notice that there’s dust and stuff that won’t come off, then you can use a small bit of water on the clothe itself; just enough to make it slightly damp to help clean it.
Never use any kind of chemicals or anything like that as there could be the possibility that it damages the device which certainly isn’t good.
If you happen to notice that there’s dust inside, I wouldn’t necessarily use a compressed air can for getting dust out that device since it’s possible it could leave some amount of moisture behind briefly which isn’t good for electronics.
What may help is some sort of electronic duster that uses dry air instead which can be helpful to remove the dust. Just be careful since the internals of these devices are delicate and start on the lowest setting first.
9). Making Sure Your Cables Are Situated
Not only does having wires all over the place take away from the aesthetic of your home theater, it can also be a tripping hazard as well.
There’s also the fact that it’s easier to troubleshoot should something go wrong, coupled with it allowing your AV system to continue working properly.
There’s many ways to do this, and it’ll really boil down to personal preference I feel, but you just want to make sure that all of your cables that connect your stuff is situated.
Not doing so can not only take away from the look of your home theater, but also could damage the wires themselves over time if they somehow get tangled.
To help you with more specific ways on hiding speaker wires by the way, be sure to check out the guide I also did on that very thing a while back.
Some speakers have the ability to bi-wire (using 2 sets of speaker wire for treble & bass) and have what’s called bi-wire jumpers that allow the user to connect those wires.
It’s often thought that better quality audio can be experienced when using wires in this way but it might be subjective and depend on the person.
Unfortunately though, over time these these parts can sometimes experience issues for a number of reasons.
Beforehand, playing a pink noise track can be a helpful way to ensure that this are actually working the way they should be.
But if you do notice something is off, then they can be lightly cleaned with a soft and dry cloth to see if it helps.
Every year or so, I’d recommend removing and cleaning them to ensure your audio quality remains pristine. Just make sure your equipment is off before doing so.
11). Cleaning Your Projection Screen & Projector Chassis
Like with anything, you may notice dust begin to accumulate on you projector screen and even in the device itself.
What makes it difficult for me to recommend any one solution to this is the fact that each screen is different — meaning each will have different cleaning needs.
So what I would recommend is referring to the manufacturer’s guide to see what cleaning solutions can be used with your particular screen since using the wrong one could damage it.
As for the projectors chassis, pretty much the same thing — you can use a dry micro fiber cloth to clean any excess dirt it may have though every so often.
12). Cleaning Dust & Fingerprints On The TV
The way you clean your television is definitely important as doing this wrong can result in you damaging the screen.
I’ve found using a microfiber clothe to helpful as it tends to remove excess dust pretty effectively in my opinion.
When cleaning it, make sure that you don’t apply any kind of pressure or anything to the screen since that could damage the panel.
If the screen is dirty and the microfiber clothe doesn’t help, then an easier way to clean the television though I’ve found is using electronic wipes.
These are specialized wipes specifically designed to clean delicate electronics.
It’s definitely personal preference, but I’ve found them to be a more efficient way to clean the screen without worrying about streaks.
13). Preventing & Remedying OLED Burn In
Renowned for their superior picture quality, OLED screens are definitely something to behold.
However there’s one drawback to these displays, and that’s screen burn in.
Screen burn happens when a stationary image on screen remains there for a prolonged period of time which causes that portion of the screen to permanently retain that element.
This can stem from a static logo from a specific channel, to a news ticker on a TV station.
While these sets have certainly gotten much better in recent years, burn in is still a thing that can technically happen.
So what can you do to avoid this, and how can you fix this if it does happen?
Well there’s a few things to remember.
Screen retention is a prior form of burn in that may show as a stuck pixel, or even line of stuck pixels, and is something that can potentially be fixed by turning down the brightness on your display or using anti burn in software on your device.
It can may even be remedied by simply playing the TV.
However burn is something that typically can’t be fixed.
So once you have it, it’s permanent.
You’ll want to avoid getting to this point though, and thankfully there are ways you can prevent this from even happening.
The most obvious would be not leaving stationary images on your television for long periods of time.
The amount of time your TV is on daily may have an impact with regards to this.
You can also lower the brightness to half, or even turn the TV off when it’s not in use.
This color inaccuracy can result in the picture quality becoming washed out & dull, or even the opposite happening; the image looking over saturated and bright.
To remedy this, try adjusting picture related settings as it’s dependent on the particular device since these settings might help shift the tone back to normal (unless the device or panel itself is failing)
Keep in mind that using the right color temperature setting may affect your perception of the image too.
Here’s more insight regarding optimizing the image quality.
Another thing that can happen over time is the focus of the projector itself can shift, causing the image to either look blurry or become titled off axis.
It may even be a subtle change that you don’t notice initially that eventually becomes more apparent.
Thankfully it’s pretty easy to fix this as it simply requires adjusting the sharpness or repositioning so that the image is represented correctly.
The text on the screen should appear sharp and if not, this could be the case.
Depending on the particular projector, it may even have specific settings to fix this very thing so check to see if yours does.
16). Fixing The Alignment Of The Projector Unit
I touched on this previously, but the projector’s alignment can possibly shift and change with extended use through the years.
A good way to test this is by looking at the image on screen an making sure it isn’t tilted one way or another when looking directly at it.
If the image appears even slightly out of the frame, then it’s likely it needs to be adjusted either physically or in the settings.
17). Fixing The Panel Alignment Inside The Projector
With use, sometimes the panels inside the projectors themselves can change or even move which can also potentially affect how the image on screen looks.
Make sure you inspect them regularly and adjust them if needed.
18). Correcting Projector Lens Shift
It’s possible that through normal usage in your home theater, the lens in the projector itself can loosen — which can then throw the presentation of the entire image out of whack.
Occasionally check to make sure the lens is fitted securely and properly aligned in its housing.
The screws should be tight and everything should feel inert.
19). Cleaning The Projector Lens
While checking for lens tightness, another thing you should make sure of is that the projector lens is actually clear of any dust or debris on or near it.
Having any kind of dust on the lens can be projected on to the screen which would impact resulting image quality.
In order to actually clean the lens of the projector, this can be done with a very gentle micro fiber clothe, however when there’s significant dust present, a lens brush can be helpful in my opinion to restore clarity.
The brush should be used in light strokes since the lens is especially sensitive and can easily be scratched if you’re not careful.
I would first check in the product guide or seeing what is recommended by the manufacturer of the projector with regards to whether water or any other specific fluids can be used for your specific projector — since the lens is sensitive and the wrong one can potentially damage it.
I definitely recommend first checking what fluids can be used according to the manufacturer since each projector is different and thus will each have individual needs (this is very important to remember)
20). Fixing The Mount Of The Projector Unit
With longterm use, it’s possible the mount of the projector itself can become loose which is really important since that’s what helps keep the projector secured when mounted.
You’ll want to periodically make sure the screws themselves remain tight since you want it to remain as secure as possible.
Fixing this is pretty easy since it’ll simply involve tightening a few screws.
Using a washer under each screw might help too since it’ll ensure the mount remains sturdy and holds the projector in place.
21). Cleaning & Replacing The Projector Filter
Finally, one of the most important ways that to maintain the health of your projector is by cleaning and replacing its filter.
An obstructed filter impedes the proper air flow and ventilation that the projector needs to properly function which can affect it’s longevity and how well it actually performs.
So my recommendation to you is at about the 180ish watch time hour mark, look at the filter for any accumulated dust or debris and clean it — & if it’s really bad, I’d replace it.
From that point, occasionally check the filter to make sure that it remains clear over time.
Final Thoughts
Hopefully this comprehensive list of home theater maintenance tips & tricks is something you’ll find useful.
With these tips, you can get help to prolong the wellbeing of your equipment and avoid mistakes that could potentially hamper them.
Speaking of mistakes, be sure to check out this guide I did on 25 of the worst home theater mistakes that people often make (some even experienced people make!)
The factors that help with choosing a great soundbar depends on what the person is looking for.
For example, one person might go to the store or online, & the information they use to decide could be reviews, the price, or even features.
So in this review of the Sony HT-S100F, we’ll take a look at a soundbar I feel offers great sound quality & clarity — and has a small enough design to fit in a variety of rooms.
But is it the right one for you?
Let’s find out.
Sony HT-S100F Soundbar Review
The Sony HT-S100F soundbar delivers clear sound with its dual tweeters & bass reflex speakers. If you have trouble hearing dialogue in your shows, or you’re just looking for a casual system to watch TV or the occasional movie with in a smaller room, it’s awesome in my opinion.
It’s good for movies too in my opinion, but do note there’s no internal or exterior subwoofer so if you’re looking for a soundbar for heavily watching movies specifically, then the Sony HT S400 model might be more your speed.
The upper ranges of the frequency response in particular were clear without being too shrill or sibilant.
I think that was one of my favorite things about it since I’ve heard soundbars before that had this issue.
Luckily this one doesn’t, and it maintained awesome clarity even at a volume without distortion.
It made an appreciable difference that I felt made watching content more enjoyable overall.
Despite being a smaller soundbar, it was still capable of getting loud while holding its composure at those higher volumes.
With 120 watts of power though, I feel it definitely makes sense why.
Sitting about 6 feet from it in average sized room, I didn’t have any issues with hearing it adequately.
I did notice that where I sat had an impact on perceived loudness though, since it didn’t sound as loud when I sat to the side of it.
The Soundstage
In terms of the HT-S100F’s overall soundstage, I felt that it did well for a soundbar.
Keep in mind though, that the sound is still technically coming from a singular direction.
The S-Force Pro feature that emulates surround sound I found to be pretty good, but it may not be a complete substitute for something like an Atmos emulation or even a traditional surround setup.
But that being said, there was some semblance of an enhanced soundstage with that feature that I felt added to the experience.
The Bass Quality
It’s important to note that this soundbar connects to the TV via HDMI or optical connection; meaning it can’t be connected with a subwoofer.
There isn’t an integrated or included subwoofer, so it reaching those thunderous lows that dedicated subs are known for isn’t probable.
However there are 2 bass reflex speakers, and I thought they performed reasonably well.
Sometimes the bass seemed a little quieter when there was a really action heavy sequence or a bass drop from what I noticed, but that was in really busy scenarios.
But for what bass is there actually does sound good.
It was authoritative and present, which added depth to the audio mix in scenes.
Music Sound Quality
I thought the soundbar performed well when it came to music too, and it did a good job with clarity and representing separation between instruments.
Even with bass heavy music, the bass had a pretty good punch and accuracy to it which was nice.
The music mode added a little more dynamism to the audio, making it feel more lively.
Overall, if you just want a soundbar for a bedroom or smaller room in the house to simply watch TV, the occasional movie on, or to listen to music with, then the Sony HT-S100F is an awesome choice to go with in my opinion.
My Experience With The Setup & Bluetooth Connectivity
Setup of the device was really easy, only requiring a single HDMI cable, and what was really cool was being able to control the TV and soundbar with the same remote.
Speaking of remotes, the remote control it came with had a beginner friendly button layout, and felt solid in the hand.
Plus, it even came with batteries!
Bluetooth connectivity worked without issue, and it easily found whatever device it was paired to.
Using my phone, the bluetooth connection with streaming remained solid with the HT-S100F.
But there were some things I noticed about this soundbar that you’ll want to consider in your decision process.
For example, there isn’t support for the DTS format, and there aren’t HDMI inputs; only outputs for connecting it to the TV via HDMI ARC.
Thoughts On Its Appearance & Design
The one thing I really liked too was the device’s slim form factor.
This made it really easy to place or wall mount which was convenient.
Plus it’s subdued aesthetic in its all black colorway allowed it to blend in.
There’s a metal grille that wraps around the front and stops mid way on the sides.
On top of the device is a textured material with the Sony logo off to the left; and controls for the unit in the middle.
On the back there’s an HDMI output, optical input, and a USB input.
As for the size of the sound bar itself, it’s relatively small about 37.8 x 14.7 x 9.2 inches so finding space for it shouldn’t be an issue.
Other than that, there’s really not much else to say about the appearance of this soundbar.
It’s slim, compact, and forgoes any fancy touches that would make it stand out.
I still thought it looked nice though, since it wasn’t too big and build quality of the product felt premium in the hands.
I’d say if you’re looking for something that’ll blend in rather than call attention to itself, this would be a good soundbar to consider.
Pros/Likes
Great clarity
Music sounds awesome on it
Low profile design
Really easy to set up
Bluetooth works well
S-Force Pro enhances soundstage
Can be wall mounted
Cons/Dislikes
Lack of Dolby Atmos
Missing support DTS format
Would like more bass
Final Thoughts
Summing up my thoughts on the HT S100F, it’s a massive step up from your typical television speakers that delivers clear and concise sound.
If you’re having trouble with hearing dialogue in your shows, or just looking for a casual system to watch movies with, this is a good choice to go with.